VMware/vCenter/vsphere

Introduction

VMware vcenter is also known as VLAB. 

You use VMware vCenter if your instructor has requested that a virtual version of Linux or Windows is needed for lab or class work in a Drexel CCI course.

VMware vCenter vs VMware on ELMS/onthehub/e-Academy: You do NOT use VMware vCenter for licensed downloads and keys for Microsoft Project, Microsoft Visio, Microsoft Access, Microsoft Visual Studio Code, and even Windows 10 and possibly other Windows OS's that you can install on personal machines.

For more information about obtaining free copies for Drexel students, staff, faculty, and instructors for that software or OS, see Azure Dev Tools - Visio, Project, and Other Microsoft Downloads.

VMware vCenter is also NOT the place to download a copy of VMware to your computer. If that is needed instead, contact ihelp@drexel.edu .

IMPORTANT! Connect to Drexel VPN app off-campus. Do NOT access vcenter through https://vpn.drexel.edu.

Do NOT use the https://vpn.drexel.edu webpage to access https://vcenter.cci.drexel.edu.
  • ONLY visit https://vpn.drexel.edu in order to DOWNLOAD the Drexel Cisco Any Connect VPN application.
  • Then INSTALL the Drexel Cisco Any Connect VPN APPLICATION.
  • Then CONNECT to the Drexel Cisco Any Connect VPN APPLICATION.
  • THEN visit https://vcenter.cci.drexel.edu
  • Do NOT visit https://vcenter.cci.drexel.edu from within the https://vpn.drexel.edu webpage.
  • You do not need to use the Drexel VPN on-campus.
  • But we also do not recommend using any non-Drexel VPN while accessing vcenter.
See VPN instructions for how to install and set-up the Drexel Cisco Any Connect VPN APPLICATION.


Instructions

Here is how to access your Virtual Machine (VM) using Drexel's VMware vCenter.

  1. Navigate in your browser to https://vcenter.cci.drexel.edu .
    Off campus? Use the Drexel VPN before visiting above.
    See VPN for how to connect to Drexel's VPN.

  2. On the VMWare's "Getting Started" page,
    click “Launch vSphere Client (HTML5).”
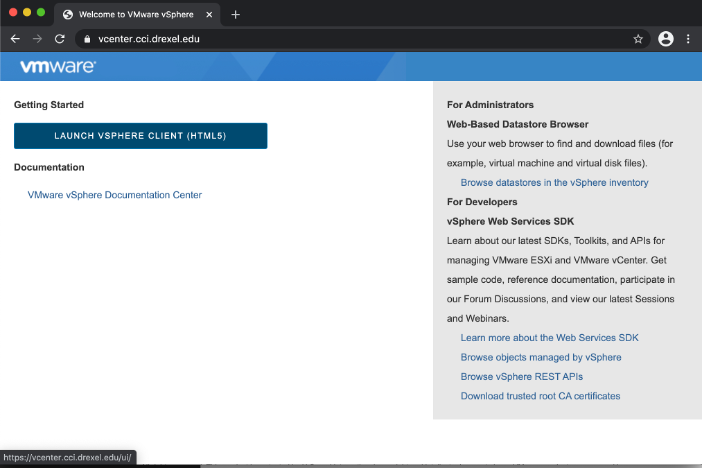
    Launch vsphere client - Connecting to vcenter 1.png

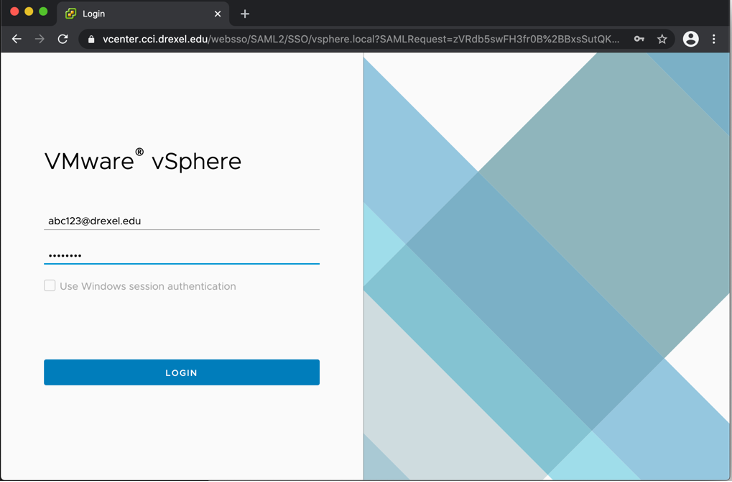
  3. Login using your normal Drexel student id & password.
    Use this format for your student id:
    userid@drexel.edu

    Login - Connecting to vcenter 2.png

  4. Once you have logged in,
    you will see one of two screens.
    (Covered in steps 5 & 6 below.)
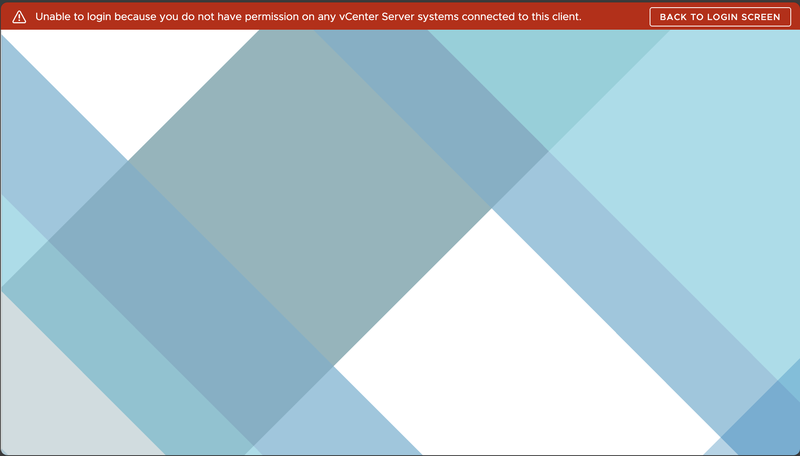
  5. If you see the screen below (blue),
    contact
    ihelp@drexel.edu
    & report that your VM is not available.

    blue screen error in vm - Connecting to vcenter 5.png
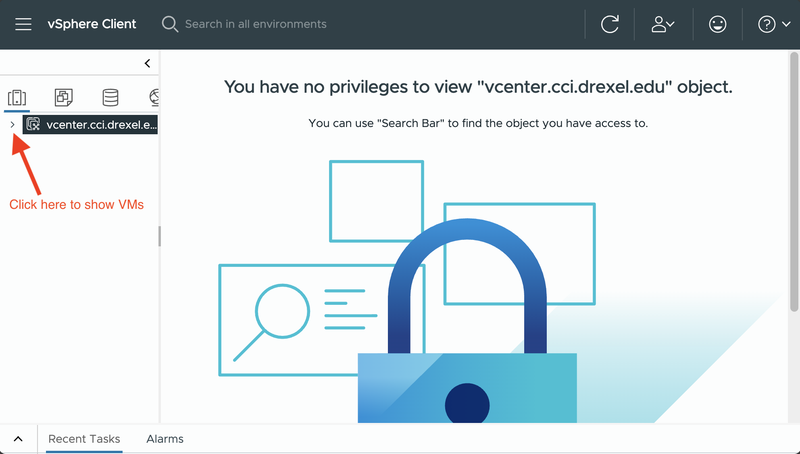
  6. If you see the screen below (with lock),
    your VM is available,
    and you can continue.
    Go to next step!

    big lock - Connecting to vcenter 6.png

  7. To get to your VM,
    expand the navigation tree on the left:
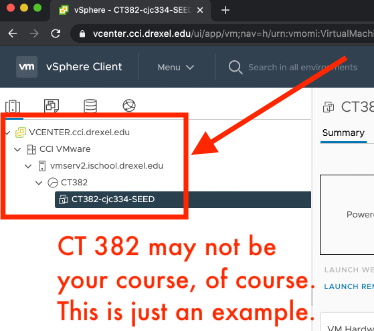
    expand tree for vm - Connecting to vcenter 4 copy.png


  8. Then click “Actions” > “Power” > "Power On.”
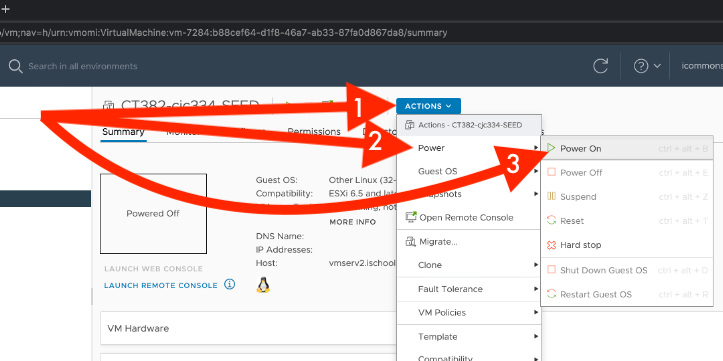
    actions then power corrected - Connect to vcenter 4_5 copy.png

  9. “Powered On” will display on top of the small black VM desktop image.
    Click the "Powered On" picture.
    It will expand to a full interactive desktop in a new web browser tab.
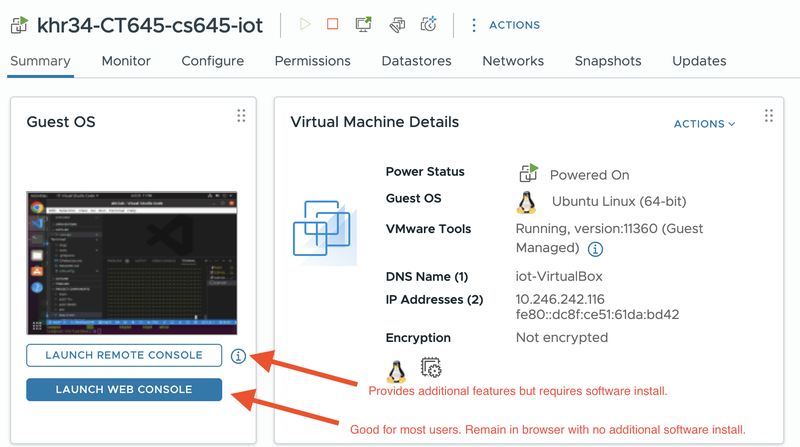
    powered on - Connecting to vcenter 6 copy.png

  10. For most users, select “Web Console."

    If you need to copy and paste into/out of the VM,
    choose "VMware Remote Console (VMRC)."

    You'll need to "INSTALL VMRC" before 1st use of VMRC, though.
    See Installing VMRC Install for Remote Console Option in VMware vCenter.

    Also, hold off until you know which you truly prefer, but...
    If you want, you can check "Remember my choice," & click "OK."
    (May not work in all browsers.)
    web console option - Connecting to vcenter 7.png
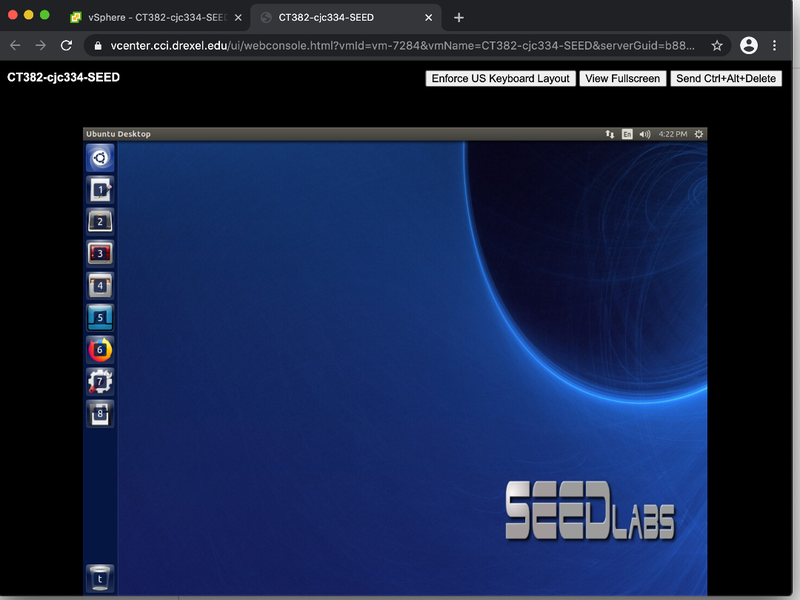
  11. Your VM will appear in a new tab. :-)
    in vm - Connecting to vcenter 8.png


Tips

  1. TIP #1
    If a download should happen,
    or a tab or window opens up that should not be opening up,
    or if you see a message that pop-up tabs or windows are blocked:

    (a) In Firefox,
    click the "Preferences" button,
    and then click "Allow pop-ups for vcenter.cci.drexel.edu."
    There are *2* example screenshots below.
    You will also likely be asked to RELOAD the webpage.
    You may also want to see:
    https://support.mozilla.org/en-US/kb/pop-blocker-settings-exceptions-troubleshooting

    Firefox Screenshot 1
    vcenter - Firefox - Click Preferences to allow pop-up windows.png

    Firefox Screenshot 2
    vcenter - Firefox - click Allow pop-ups for vcenter cci drexel edu.png


    (b) In Chrome,

    see the following weblink,
    and scroll down to "Allow pop-ups from a site."

    There are *2* example screenshots below.
    The first shows how you allow pop-ups.
    The second shows the prompt to reload the webpage.
    You may also want to see:
    https://www.howtogeek.com/411439/how-to-allow-or-block-popups-in-chrome/

    Chrome Screenshot 1
    VCL - Chrome - Allow Notications.png

    Chrome Screenshot 2VCL - Chrome - Allow Notifications - Reload page.png


  2. Tip #2
    If you run into any issue at all,
    also be sure to disable any ad blocking, or script blocking, or privacy enhancing add-ons or plug-ins for https://vcenter.cci.drexel.edu .

    An example of how to disable uBlock Origin is at the link below.
    You might have AdBlock or NoScript or Ghostery
    or some other ad blocker, script blocker, and/or privacy enhancer.
    vcenter - Disable ad blockers or script blockers.png


Example -- Set Up & Shut Down of Ubuntu Linux VM

Here is an example of how to boot up and shut down an Ubuntu Linux Virtual Machine (VM),
once that VM is spun up in an internet browser tab.

Your instructor and lab assignment might not call for using Ubuntu Linux.

If so, follow your instructor's instructions instead.

  1. Wait for Linux Ubuntu to boot up.
    vcenter - Linux VM booted up.png

  2. CT 210 students, click the "Try Ubuntu" button.
    If your Instructor provides instructions to "Install Ubuntu,"
    click that button instead,
    and follow the on-screen instructions,
    and your instructor's instructions.
    vcenter - click Try Ubuntu.png

  3. Do your lab assignment (if it calls for Ubuntu Linux).
  4. When finished, click the gear icon in the upper right,
    and click "Shut Down..."
    vcenter - PowerDown - click gear icon and Shut Down.png

  5. Click the large "Shut Down" button.
    vcenter - Linux VM - large shut down button.png

  6. Press the Enter/Return key on the keyboard when prompted to finish the shut-down process.
    vcenter - Ubuntu VM - press ENTER.png

  7. When the Ubuntu Linux VM is fully "powered down" (black screen) in the web browser tab,
    close the web browser tab.
    vcenter - Ubuntu Linux VM - close tab when powered down.png

Troubleshooting

General Tips

  • Using Chrome or Firefox is highly recommended.
  • We also recommend disabling any ad-blocking or script-blocking or privacy-enhancing add-ons or plug-ins for https://vcenter.cci.drexel.edu .

Do NOT access vcenter.cci.drexel.edu through https://vpn.drexel.edu

  • Do NOT access vcenter by going through the webpage at https://vpn.drexel.edu
  • You should connect to the Drexel VPN through the Cisco AnyConnect app, which you download and install through the above webpage.
  • But AFTER you download and install the Cisco AnyConnect app and connect to vpn.drexel.edu IN THE CISCO ANYCONNECT APP, you do NOT go to https://vpn.drexel.edu any more.
  • You GO DIRECT to https://vcenter.cci.drexel.edu to access vcenter.
  • Below is BAD!
    vcenter not through vpn_drexel_edu


Non-Drexel VPN's on- or off-campus are NOT Recommended

  • We do not recommend non-Drexel VPN's to access vcenter, either on-campus or off-campus.


Cannot Login to vcenter.cci.drexel.edu?

  • Make sure you use your Drexel short-form email address, *not* just your DrexelOne userid.
  • Example of Someone's Drexel short-form email address: mjg88@drexel.edu
  • Example of that Same Drexel User's DrexelOne userid: mjg88
  • Do not use the DrexelOne userid.
  • Use the Drexel short-form email address.

pfSense Lab users? Cannot access pfSense in a Web Browser?

  • Do you have the pfSense VM from vcenter.cci.drexel.edu open and running and configured, per the instructions given to you by your instructor?
  • Try making sure you have both the pfSense VM and the Ubuntu or Trusty VM open and running in separate tabs in your web browser.
  • And follow what the instructions say carefully about setting up pfSense.
  • Some instructors have older instructions, or may have videos or instructions slightly out of order. Read ahead or look for videos from your instructor if confused.


Cannot Login to a VM, Especially a Trusty VM?

  • LOOK CAREFULLY AT THE INSTRUCTIONS PROVIDED TO YOU BY YOUR INSTRUCTOR!
    They often provide an initial username and/or password to use.
    For example: CT 400 for Trusty VM's often use usernames of either "student" or "pfstudent".
    And use password of "P@$$w0rd". (But not always.)
  • Do NOT include quotation marks OR periods in the username OR password.
  • Be sure to change your password after your first successful login.
    Google how to change your password on what OS you are on (Linux, Windows, Ubuntu, etc).

Not Sure How to Power Off Your VM?

  • See step 7 and 7a in the above "Instructions" section.

Installing VMRC for "Remote Console" option


Cannot get to pfSense at 192.168.1.1 in your Trusty Ubuntu VM (if part of your lab)?

  • Make sure both pfSense VM & Trusty Ubuntu VM are running at the same time.
  • You need to have the pfSense VM running first
    and to keep that VM up and running in one tab in your internet browser
    while you visit 192.168.1.1 in the Trusty Ubuntu VM in another tab in your web browser.
  • Also, see the next section on no internet access in your Trusty Ubuntu VM.

Trouble Installing pfSense (if part of your lab)?


No Internet Access in Trusty Ubuntu VM?

  • First, make sure the pfSense router VM is powered on as well,
    especially if you have already been using the pfSense router VM!
  • Second, if you have a metasploitable counterpart VM,
    neither the metasploitable or other VM will have internet access by design.
  • With above in mind, try the following...
  • Click the WiFi icon in the upper right of your Trusty Ubuntu VM
    when you have that web browser tab open, after logging into vcenter.
  • Make sure “Enable Networking” is checked.
    If it’s not, select “Enable Networking” to check it or enable it.
  • If that doesn’t help,
    check the WiFi icon again in the upper right of your Trusty Ubuntu VM again, and select “Wired Connection 1.”
  • And if that doesn’t help, make sure your computer (not either VM) is actually connected to the internet and that you can browse to some website you haven’t visited before, just to make sure your internet is working.
  • If that doesn’t help, shut down the Trusty Ubuntu VM, and close the tab, close the tab (if open) for pfSense, logout of vcenter, close all web browser windows, wait 20 seconds, and then re-open your web browser and try again.
  • If that doesn’t work, try Chrome instead of Firefox as your web browser for vcenter.cci.drexel.edu, or try Firefox instead of Chrome for vcenter.cci.drexel.edu.
  • If that doesn’t help, connect by VPN if you haven’t already (usually a really good idea for this).
  • If you login to the VPN, but the VPN keeps having a login error, you need to use your Drexel email or Office 365 Multi-Factor Authentication or MFA method to approve the connection on your cellphone, mobile device, or telephone.

My VM does not appear in the left navigation, after logging

  • Be sure to click to expand the left navigation options.
    pfSense left nav expand 1

    pfSense left nav expand 2                          pfSense left nav expand 3


pfSense VM boot looping (rebooting over and over again)?

If you get into a boot loop with pfSense:

  1. When you see the screen to boot to multi or single user,
    press the number for single user usually 2,
    but look for single user,
    and press the corresponding number.
    OR press the spacebar.
  2. At the command line prompt,
    type in
    cd /sbin

    or
    cd sbin/
  3. Then type in
    ls

    and check that "fsck" appears somewhere in the outputted list of files, folders, and applications.
  4. Then type in:
    fsck -y /
    Let the above fsck command finish running. 
  5. Then re-run 2 more times.
    Press the up keyboard arrow key,
    and Enter/Return keyboard key.
    Or re-type in the same fsck command as shown above.
    The fsck command does a little more file system checking/repair each time.
    Running it 3 times in total should do it.
  6. Then type in reboot at the command line prompt. 
    pfSense should reboot once now.
  7. Final Important Step:
    When you get to another list of options, do NOT choose "1 Reboot (ssh only)" or "0) Logout (SSH only).
    Do *NOT* press 0 or 1 either.
    Instead, press "6) Halt system" (pfsense).
    Then type y
    And then give pfSense in the VM some time to shut down.
    Disregard any "An unrecoverable IOException occurred so the connection was closed" errors.
    When pfSense is shut down, close your internet browser tab.
    When you re-open pfSense again (Actions > Power > Power On in vcenter.cci.drexel.edu web browser tab).
    and get it configured as mentioned in the early labs for your tutorial,
    You should not have to use the 6 or Halt command again.
    You should just be able to leave the pfSense VM running,
    and be able to close your web browser tab for the pfSense VM,
    unless you run into an issue again.


pfSense vcenter VM Student and sudo Password

  • To access vcenter, you need to use your Drexel userid@drexel.edu with Drexel password, after connecting to the Drexel VPN (not via the Drexel vpn website either).
  • But if you are on your Ubuntu VM and trying to access the pfSense VM via the Terminal Console window (Command Line Inferface or CLI) & using the sudo command to install a package like NMAP, or simply trying login to the pfSense VM with the default Student account, try the default password of P@$$w0rd
  • If you changed the password from the default password, the password is going to be the same password you use to login to the Student account on the pfSense VM with.
  • If you are still not sure, but still have access to the pfSense VM,
    you can try to guess it by installing a package via sudo, or try the sudo -l command as shown below.
    Your password will not appear as you type it.
    Make sure CAPS LOCK is off.
    If you still cannot guess your password,
    email ihelp@drexel.edu and let us know the course # and instructor and the assignment.
    pfSense vcenter sudo password and access check


SEED password

dees

That's it.


kern.ipc.maxpipekva exceeded; see tuning (7)

The kernel's inter-process communication (IPC) settings. The maximum kernel virtual address space for pipes has been exceeded. They say see manual page 7 on "tuning"....

BUT...

INSTEAD...

Just do the fsck command as instructed in the next section: "/dev/sda1 contains a file system with errors"


SEED or other Ubuntu VM error: /dev/sda1 contains a file system with errors

If you see the error below (OR SIMILAR OR JUST HAVE AN PROMPT) when you try boot up or reboot or reset your SEED lab or other Ubuntu VM, especially for CT 382...

/dev/sda1 contains a file system with errors, check forced
Inodes that were part of a corrupted orphan linked list found.

/dev/sda1: UNEXPECTED INCONSISTENCY; RUN fsck MANUALLY.
(i.e.,, without -a or -p options)
fsck exited with status code 4
The root filesystem on /dev/sdal requires a manual fsck

BusyBox v1.22.1 (Ubuntu 1:1.22.0-15ubuntu1) built-in shell (ash)
Enter 'help' for a list of built-in commands.
(initramfs) 

Then type in the command below . Type this command below RIGHT AFTER the (initramfs) prompt or other command prompt. Press the Enter/Return key on your keyboard to enter/run the command, of course.

fsck -y /dev/sda1

NOTE: If the error mentions /dev/sda5 or /dev/sda2 or /dev/dsa3, etc, then you use that for the /deve/sda# portion in the above command instead of /dev/sda1. So if it says in the error message /dev/sda5, then the command is instead: fsck -y /dev/sda5

Like so...

fsck manual run 2

Let the command finish running until you see the (initramfs) prompt on its own line again.

Close the web browser tab with the VM in it.

Go to the web browser tab for vcenter.cci.drexel.edu , click ACTIONS > Power Down. 

Do the same for any pfSense or other VM's you have running. If pfSense is boot looping, see our other section on that.

Restart pfSense first, but restart all the VM's as follows:

Wait 10 seconds. Click ACTIONS > Power On. Click the little window showing your VM. In the new web browser tab, click Ubuntu (or let pfSense start back up) and press Enter/Return. Wait up to 30 seconds. Your VM should boot up normally now.


"Invalid Mac OS Version"

See next section on Remote Console Not Working.


Remote Console Not Working -- Try Web Console

  • Make sure you are going to the https://vcenter.cci.drexel.edu website & that you are logging in while on VPN (the app, not the website).
  • Also, Web Console is another option instead of Remote Console. See picture below.
  • If you can use Web Console instead of Remote Console, and you might want to try, even if your lab or assignment instructions say otherwise, we recommend trying that.
  • Especially as what we suggest below to fix the issue with Remote Console may not work, and you may be up against a deadline before we can assist you further.
  • Still use the VPN.
  • And note that some labs will still require you connect to another vm first, (for example, the pfSense VM), and let it fully boot before using the vm you need to use.

vcenter

Remote Console Not Working on Mac -- Various Ways to Uninstall then Reinstall Remote Console

If you need to use Remote Console, I'd actually try uninstalling and reinstalling the VMware Remote Console app on your Mac.

Here's how to do so:

  1. Start with the simple uninstall methods shown on this video:
    https://www.youtube.com/watch?v=pcXgAbiSjpw
  2. Then try to install the app again from here:
    https://apps.apple.com/us/app/vmware-remote-console/id1230249825?mt=12
  3. Then follow the instructions here:
    https://support.cci.drexel.edu/cci-virtual-lab-resources/vmware-vcenter-or-vsphere/installing-vmrc-install-remote-console-option-vmware-vcenter/
  4. Reboot and try to access your vm1 lab in vcenter.cci.drexel.edu again.
  5. If that fails, try the method at the following YouTube to uninstall. I use this app in this YouTube all the time. Check all the boxes and delete what it finds. AND THEN, repeat steps #2-4 again above.
    Here's the YouTube for this step #5:
    https://www.youtube.com/watch?v=jKxq25PhvVc
  6. If all of that fails, try the method at this other YouTube video to install. It's more manual. AND THEN repeat steps #2-4 above.
    Here's the YouTube video for this step #6:
    https://www.youtube.com/watch?v=IgRi0Z1O_gk
  7. If all of that fails still, send us screenshots of your entire display & what version of Mac OS you are running & what browser you are using.

8. If something above resolves your issue, or you find another solution, let us know that too.


Troubleshooting Note for CCI Commons Student Assistants

CCI Commons Student Assistants and CO-OP:
ONLY power off, shutdown, reset, or reboot a VM in VMware vcenter
that has a Drexel userid in the name.

Examples:

  • CT210-mjg88-Ubuntu
  • CT400-bjb344-KaliLinux
  • CT212-jpm46-Trusty
  • CT212-jpm46-pfsense

In general, only full-time tech staff should EVER power off, shutdown, reset, or reboot anything in vmware vcenter that does NOT have a Drexel userid in the name of the VM.


ELMS Emails if Someone Needs to Download and Install Vmware to their Computer.

This is NOT what the majority of CCI students.

Downloading VMWare (ELMS tickets)

If we get a ticket for ELMS where they want to download a copy of VMWare, assign the ticket ot John McNamara, and email John McNamara.

But mention that there are free versions of VMWare now.

THESE ARE NOT WHAT YOU WOULD USE FOR CCI CLASSES ANYMORE!! Go to https://vcenter.cci.drexel.edu and see the other instructions above instead. We also are not supporting recreational personal use of VMWare.